CONTROL AND MEASUREMENT SET UP.
Controller and Receiver setup.
In order to control the drone remotely, we need a controller and radio transmitter/receiver.
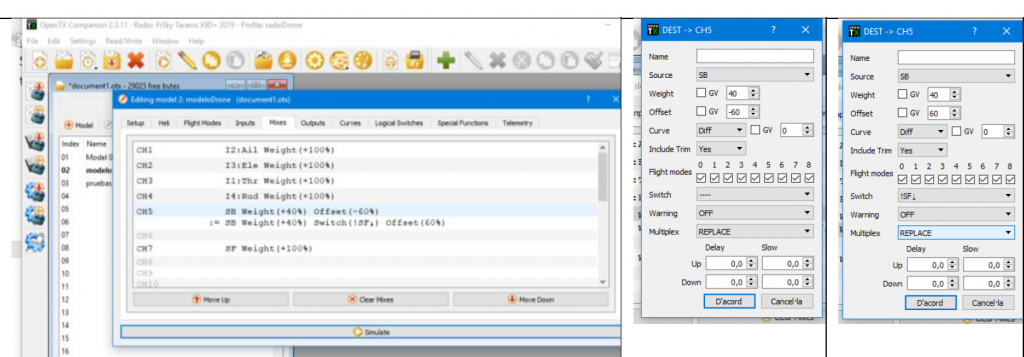
We start with the controller, our goal is mapping each channel with the input signal, e.g. channel 1 is throttle. We finished that with Open TX Companion software. After installing the Open TX, we can follow this picture to complete the configuration:
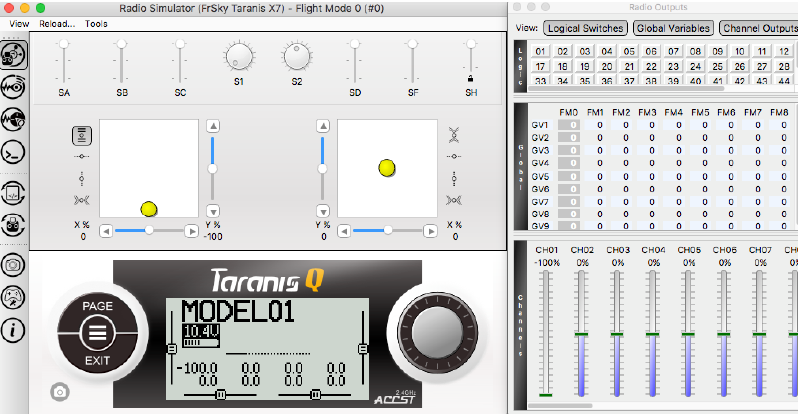
After the simulation, we should be ready to write the configuration to the controller. Because the controller has a transmitter, we have to bind it to a receiver that is connected to the brushless motor. You can follow this video to finish this part:
Measurement Setup
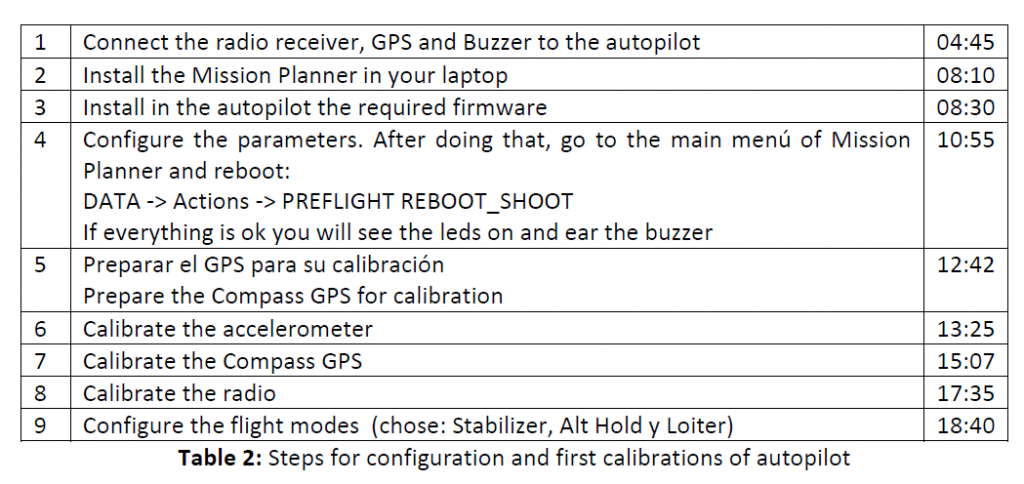
Drones depend on many essential parts to fly, such as accelerometer and GPS, we followed this table and video to complete the installation of them.
https://ardupilot.org/planner/docs/mission-planner-installation.html
Download the latest Mission Planner installer from here, after clicking here the mission planner exe file will be downloaded.
3 Once installed the mission planner installed is time to download the firmware of the drone, first connect the autopilot to the PC with the USB cable, go to install firmware and choose your model. Once donwloaded be sure that is the latest version. If you go to HELP (top of mission planner) you will be directed to another page where you can request the latest version. If the latest version is downloaded you will see a message saying that (check for updates) (no update available). Then you are sure that everything is updated. Then, you have to verify that your autopilot is connected, go to top right and first choose the port, (you will see COM cube orange mavlink) take this one and connect. Once connected move your drone and you will see in you PFD (Primary flight display) how is moving.
After that, we should do more calibration so that we can use the controller to control the motor, but now we can switch mode using the controller and see the change in the mission planner.
SET UP BEFORE FLIGHT
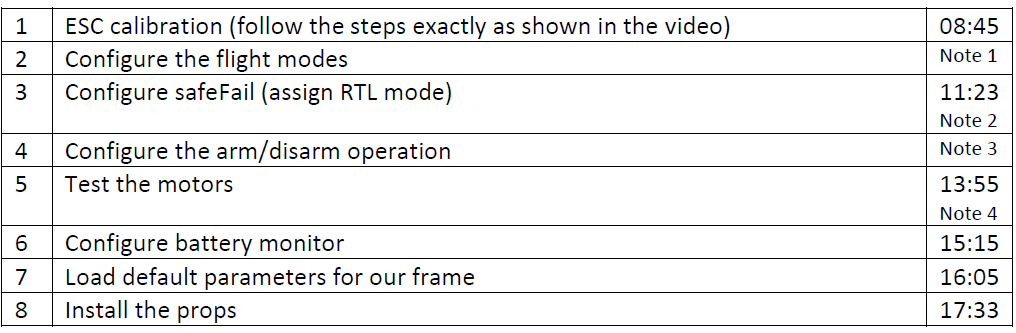
Info about ESC: Electronic Speed Controllers (ESC) are an essential component of modern quadcopters (and all multirotor), offering high power, high frequency, high-resolution 3-phase AC power to a motor in an extremely compact miniature package.
In the ESC calibration, we met some trouble, we followed the instruction but the motor didn’t spin. The reason for that is thrust level in the fail-safe setting is too high(975), every signal will be recognized as “invalid input”, after modified the thrust level to 960, we finished the ESC calibration successfully.
Please watch this video to know more about Failsafe FTL function.
After setup the ESC, we should be able to view the motor spinning!
Errors in this phase
This drone was mounted together with other drones in the same room, to avoid interference between drones we had to change the NetiD of the telemetry radio. Our drone was changed to number 4 as the group.
The Rc came configured with an unintuitive pitch when flying, we changed the reverse pitch to make easier our flying. Up forward, down backwards.
Another problem was the incorrect centering in our RC of the joysticks. We had to calibrate it again.